The goal is to create the perfect Bitcoin Lightning node, running on unfairly-cheap hardware, set-up completely trustless from scratch. This guide brings you what I think is a near perfect solution.
Medium
Running our own nodes is important, both to learn more about this amazing technology, and also keep the network decentralized by not trusting any third party.
Being able to do that on cheap hardware is important. This is why I published the Beginner’s Guide to Lightning on a Raspberry Pi (my RaspiBolt) this January, which created a lot of positive feedback.
The Pi is available everywhere and has a huge community. It has some drawbacks, however, mainly in the area of performance and the the hassle with attaching external storage that is important when storing the whole Bitcoin blockchain. One feedback sparked my interest to consider the Odroid HC2 mini-computer.
http://www.hardkernel.com/main/products/prdt_info.php
Compared to the Rasperry Pi, it has the following advantages:
- price comparable to Raspberry Pi
- more powerful (8 core CPU, 2 GB RAM, Gigabit Ethernet)
- internal housing of harddisk, direct connection using SATA3
- only one power adapter for everything
Not available are features like HDMI output, built-in Wifi or GPIO pins, all of which are not relevant to this project, however.
Performance is way better and production is guaranteed until at least 2020 (and longer, if parts are available), thus it seems more future-proof.
Performance of Odroid HC2 is identical to XU4 (which is more of a media pc)
I decided to try this setup, ordered the Odroid HC2 and, after setting it up and running it for a month now, I think this is as good as it gets for a low-cost Bitcoin / Lightning node.
This is why I am going to describe the setup of a Bitcoin Core full node with a LND lightning node here, in case you might want to try this as well. It will not be a beginner’s guide, however, but the setup is comparable to the RaspiBolt guide, so you can easily get more detailed explanations from there. For easy reference, I kept the chapter numbers the same in both guides. Over there, I also write more about my motivation and the purpose of running a node.
As this project needs a cheesy name as well, I’ll call my node Thundroid.
Please note that only the setup for Lightning on Bitcoin testnet is described at the moment. Once a well-tested mainnet release of Lightning is available, I will update this guide and provide update instructions.
1) Hardware Requirements
I ordered the following items directly with Hardkernel in Singapore. There are resellers available worldwide, but not for Switzerland, unfortunately.
- Hardkernel Odroid HC2 ($54)
- Power adapter & cord ($7)
- optional: Odroid HC2 case ($5)
You also need the following:
- Micro SD card: 8 GB or more, incl. adapter to your regular computer
- Internal hard disk: 300 GB or more, SATA, 3.5" hdd, or 2.5" hdd/ssd
- Network RJ45 cable
Considerations for Bitcoin mainnet
This guide is configured to use the Bitcoin testnet. You can easily download and verify the blockchain using the Odroid HC2. However, for a switch to Bitcoin mainnet, will will need to initially download and verify the Bitcoin blockchain on a regular computer (only once, not regularly).
There are multiple options (not covered in this guide) to transfer the mainnet blockchain (~200 GB) to your node:
- connect your internal hard disk directly to your computer,
- transfer the blockchain over the network
- use an additional external hard disk to transfer the data via USB.
We are going to format the internal hard disk using the Ext4 file system, which is not compatible with windows. If you want to connect the hard disk later to a windows computer, you need additional software (free for once-time-usage).
Assemble the hardware
Assembly is easy, just enter the hard disk and fix it with the the screws included with your Odroid. If you ordered the plastic case, just slide it over the metal body.
2) Write down your passwords
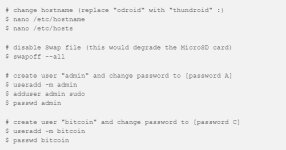
Create strong passwords for the following users and interfaces. As this is not a Pi, I will use the user “admin” instead of “pi” in the original guide.
[ A ] User password for “admin” and “root”
[ C ] User password for “bitcoin”
[ D ] Bitcoin wallet password
[ E ] Bitcoin RPC password
[ F ] Lightning API password
3) Installing the operating system
We use Ubuntu 16.04.03 LTE (Minimal, Bare OS) that is provided by Hardkernel.
https://wiki.odroid.com/odroid-xu4/os_images/linux/ubuntu_4.14/ubuntu_4.14
Download the image, flash it on your MicroSD card, put it into your Thundroid, connect it to your network via cable and connect the power adapter. The initial boot can take several minutes. SSH is on by default.
4) Connecting to the network
Give your Thundroid a fixed IP address in the DCHP settings of your router like in the Guide for Rasperry Pi:
The node is starting and getting a new address from your home network. This address can change over time. To make the Pi reachable from the internet, we assign it a fixed address.
Accessing your router
The fixed address is configured in your network router: this can be the cable modem or the Wifi access point. So we first need to access the router. To find out its address,
- start the Command Prompt on a computer that is connected to your home network (in Windows, click on the Start Menu and type cmd directly or in the search box, and hit Enter)
- enter the command ipconfig(or ifconfig on Mac / Linux)
- look for “Default Gateway” and note the address (eg. “192.168.0.1")
–> additional information: accessing your router.
Now open your web browser and access your router by entering the address, like a regular web address. You need so sign in, and now you can look up all network clients in your home network. One of these should be listed as “raspberrypi”, together with its address (eg. “192.168.0.240”).

Client list in an ASUS router
Setting a fixed address
We now need to set the fixed (static) IP address for the Pi. Normally, you can find this setting under “DHCP server”. The manual address should be the same as the current address, just change the last part to a lower number (e.g. 192.168.0.240 → 192.168.0.20).

–> need additional information? Google “[your router brand] configure static dhcp ip address”
Port Forwarding
Next, “Port Forwarding” needs to be configured. Different applications use different network ports, and the router needs to know to which internal network device the traffic of a specific port has to be directed. The port forwarding needs to be set up as follows:

—> additional information: setting up port forwarding.
Save and apply these router settings, we will check them later. Disconnect the Pi from the power supply, wait a few seconds, and plug it in again. The node should now get the new fixed IP address.
5) Working on your Thundroid
The command prompt
Everything is configured on the Linux command prompt. Throughout this guide I use the following notation:

When you enter commands, you can use the “Tab” key for autocompletion, eg. for commands, directories or filenames.
If you are using Windows, I recommend to use the SSH client KiTTY. You can copy text from the shell by selecting it with your mouse (no need to click anything), and paste stuff with a right-click.
Basic configuration
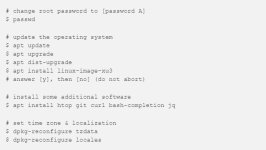
Connect to the node using SSH. The access credentials are
- user: root
- password: odroid
When using the Nano text editor, you can use the same keyboard shortcuts to save (Ctrl-O, confirm or change filename & press enter) and exit (Ctrl-X)
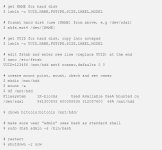
Mounting the hard disk
6) Hardening your Thundroid
Login as “admin” (we will not use “root” again).
fail2ban
Fail2ban monitors SSH login attempts and bans a remote peer after 5 unsuccessful tries for 10 minutes.

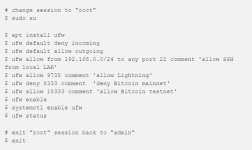
UFW: Uncomplicated Firewall
The firewall denies all connection attempts from other peers by default and allows only specific ports to be used.
SSH Keys
We will disable login via password completely and require a SSH certificate. To create it for your “admin” user, please follow this guide:
https://www.tecmint.com/ssh-passwordless-login-with-putty/
If you can log in as “admin” with your SSH key (check!), we disable the password login.
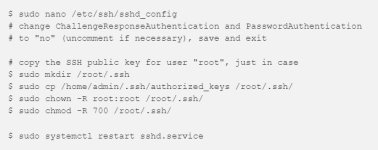
You can now only login with “admin” or “root” and your SSH key. As you cannot connect a screen to the Odroid, SSH is your only option.
Backup your SSH key! There is no fallback login!
Worst case scenario: you need to flash the MicroSD card and set up the system again, all important stuff is still on the harddrive.

